BRAKE SYSTEM BLEEDING
1988 Jeep Cherokee
1988 BRAKES
Jeep - Brake System Bleeding
Cherokee, Comanche, Grand Wagoneer, Wagoneer, Wrangler
BRAKE SYSTEM BLEEDING
Hydraulic system bleeding is necessary any time air has been introduced into system. Bleed brakes at all 4 wheels if master cylinder lines have been disconnected or master cylinder has run dry. Bleed brakes with vacuum bleeding equipment, pressure bleeding equipment or by manually pumping brake pedal while using bleeder tubes. Always bleed brake lines in sequence. See BLEEDING SEQUENCE table.
MASTER CYLINDER BLEEDING
Bench Bleeding
Master cylinder must be bled before installation to
prevent excessive amounts of air from entering the brake system,
creating poor brake operation.
Place master cylinder in soft-jawed vise. DO NOT tighten
vise enough to damage master cylinder. Install bleeder tubes in both
outlets of master cylinder. See Fig. 1.

30000
Fig. 1: Bleeding Master Cylinder Courtesy of American Motors/Jeep Corp.
3) Fill master cylinder with clean brake fluid that meets DOT 3 specifications. Ensure that the end of bleeder tubes are submerged
in the brake fluid.
Using proper sized rod, apply and release master cylinder
until no air bubbles exist in brake fluid flow. Once all air bubbles
are gone from master cylinder secure cap and install.
Bleeder tubes should be left installed on master cylinder
until master cylinder in installed. Master cylinder must be bled at
brake lines and wheels after installation.
Bleeding On Vehicle
Install master cylinder on vehicle after bench bleeding.
Remove bleeder lines and install brake lines. DO NOT fully tighten
brake lines at this time.
Slowly force brake pedal to the floor and hold in this
position. Tighten brake lines and release brake pedal. Repeat
procedure until no air bubbles exist at brake lines. Remaining wheel
cylinder or calipers may be require bleeding.
HYDRAULIC CONTROL VALVES
Hold Off Valve
Prior to the pressure tank bleeding procedure, the hold
off valve incorporated in the combination valve must be correctly
positioned. This allows brake fluid to flow through the combination
valve to the entire brake system.
The valve stem of the hold off valve may be retained using
tools available from Chrysler Motors (C-4121) or General Motors
(J-23709) during bleeding procedure. See Figs. 2 and 3. Remove valve retainer once brake bleeding procedure is complete.
CAUTION: DO NOT use rigid clamp to position valve stem. Damage to the valve assembly may result causing brake failure.
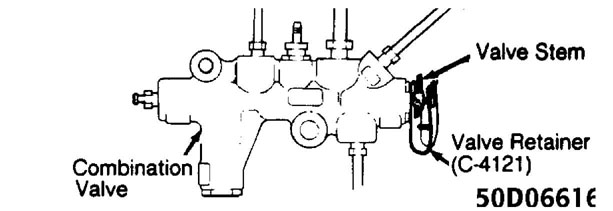
Fig. 2: Positioning Hold Off Valve Courtesy of American Motors/Jeep Corp.
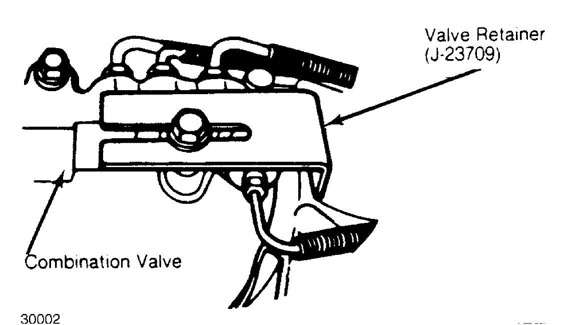
Fig. 3: Positioning Hold Off Valve Courtesy of American Motors/Jeep Corp.
VACUUM BLEEDING
Fill master cylinder. Install vacuum bleed equipment to first bleeder valve to be serviced. Open bleeder valve 3/4-1 turn. Depress vacuum pump and pull fluid into reservoir jar. Bleed each bleeder valve in sequence. See BLEEDING SEQUENCE table.
PRESSURE BLEEDING
Clean master cylinder cap and surrounding area. Remove
cap. With pressure tank at least 1/2 full, connect to master cylinder
with adapters. Attach bleeder hose to first bleeder valve to be
serviced. See BLEEDING SEQUENCE table.
Place other end of hose in clean glass jar partially
filled with clean brake fluid so end of hose is submerged in fluid.
The hold off valve must be positioned properly before pressure
bleeding (if equipped). See HYDRAULIC CONTROL VALVES under BRAKE
SYSTEM BLEEDING in this article.
Open release valve on pressure bleeder. Follow equipment
manufacturer’s pressure instructions or see PRESSURE BLEEDER SETTINGS
table. Open bleeder screw 3/4-1 turn and note fluid flow.
Close bleeder screw when fluid flowing is free of bubbles.
Repeat procedure on remaining wheels in proper sequence. Check brake
pedal operation after bleeding has been completed.
Remove pressure bleeding equipment and valve retainer from
hold off valve. Ensure that master cylinder is full of fluid.
PRESSURE BLEEDER SETTINGS TABLE
Application psi (kg/cm2) |
All Models 15-20 (1.1-1.4) |
MANUAL BLEEDING
NOTE: When bleeding disc brakes, air may tend to cling to caliper walls. Lightly tap caliper, while bleeding, to aid in removal of air.
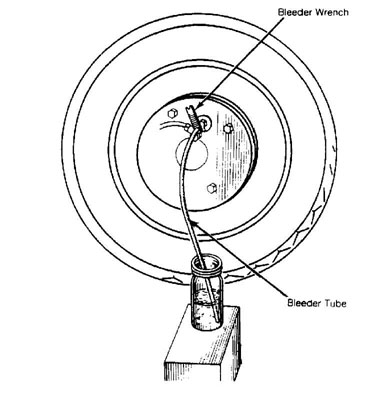
Fill master cylinder. Install bleeder hose to first
bleeder valve to be serviced. See BLEEDING SEQUENCE table. Submerge
other end of hose in clean glass jar partially filled with clean brake
fluid. See Fig. 4.
Open bleeder valve 3/4-1 turn. Depress brake pedal slowly
through full travel. Close bleeder valve and release pedal. Repeat
procedure until flow of fluid shows no signs of air bubbles.
NOTE:
When bleeding brake system manually, ensure bleeder valve is closed when brake pedal is released.
30346
Fig. 4: Wheel Cylinder Bleeding Procedure Courtesy of American Motors/Jeep Corp.
BLEEDING SEQUENCE
Before bleeding system, exhaust all vacuum from power unit by depressing brake pedal several times. Bleed master cylinder (if equipped) with bleeder screws. Bleed slave cylinder on vehicles equipped with remote mount power assist units. Bleed wheel cylinders and calipers in sequence. See BLEEDING SEQUENCE table.
BLEEDING SEQUENCE TABLE
Application Sequence
All Models RR, LR, RF, LF
