UNIVERSAL JOINTS
1988 Jeep Cherokee
1988 Drive Shafts - Universal Joints All Manufacturers
MAINTENANCE
Whenever drive shaft is removed from vehicle of if slip yoke sticks in extension housing seal, clean yoke with solvent. Lubricate inside diameter of seal with synthetic oil seal lubricant, and outside diameter of seal with transmission fluid.
OVERHAUL
NOTE: Universal joints should not be disassembled unless external leakage or damage has occurred.
Before disassembly, scribe alignment marks on yoke and shaft to allow reassembly in original position. If joints are rusted or corroded, apply penetrating oil before pressing out bearing cups or trunnion pin.
CROSS SHAFT & ROLLER TYPE UNIVERSAL JOINTS
There are 2 different retaining methods used for bearing cups, either snap rings or nylon retainers. Joints with snap rings may be taken apart and reassembled, using same cross shaft and bearings. Joints with nylon retainers are disassembled by breaking nylon retainers. Retainers must be replaced after service.
Removal & Disassembly
1) Disconnect yoke or flange attaching bolts and remove drive shaft from vehicle.
NOTE: DO NOT use a pry bar to hold drive shaft while loosening bolts. Damage to bearing seals may result.
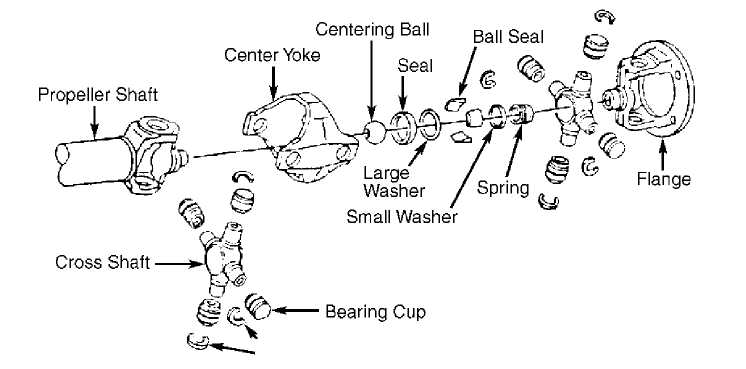 Fig.
Fig.
31767 ^Snap Rings
1: Exploded View of Jeep Constant Velocity Type Universal Joint
2) Remove retaining strap (if equipped). Remove bushing retainers from yoke. Press out rollers and bearings. Remove last roller and bushing assembly by pressing on end of cross shaft.
3) Remove cross shaft assembly from yoke. DO NOT remove seal retainers from cross shaft. Cross shaft and retainers are serviced as an assembly.
Reassembly
Coat
roller and bearing assemblies with lubricant, and
fill reservoirs
in ends of cross. Place cross assembly in drive shaft
yoke, and
place roller and bushing assemblies into position.
Press
both bushing assemblies into yoke until retainers
can
be installed, being careful to keep cross aligned in center
of
bushings. Install retainers, then
repeat procedure for remaining
bushings.
CONSTANT VELOCITY (CV) TYPE
NOTE: To prevent damage to constant velocity joints, center ball
when removing drive shaft assembly. When handling drive shaft after removal, support shafts on both sides of constant velocity joint if drive shaft is being moved horizontally. DO NOT allow one end to hang free or one shaft to bend at sharp angle. After removal, shaft may be carried vertically without damage.
Removal & Disassembly (Jeep)
Disconnect
yoke attaching bolts and flange attaching
bolts,
and remove drive shaft from vehicle. Mark joint so that center
yoke,
end yoke, and cross shafts will be installed in original
positions.
Pry out
all snap rings and press bearing out enough to
allow bearing end
to be clamped in vise. Tap on yoke until it is free
of bearing.
Repeat
procedure for remaining bearings. Remove remaining
parts from
center yoke assembly.
Reassembly
Pack all
bearings with specified grease. Assemble center
yoke components
in reverse order of disassembly.
Using
arbor press or vise, press 2 opposing
bearings into
osition at same time
until all bearings are installed. Be sure cross
shafts
and yokes remain aligned during this process.
Check
for free movement of joint. If bind exists, seat
bearings
by sharply rapping yokes with brass hammer. Never hammer
on
bearings.
Install
drive shaft in vehicle, making sure marks made
during disassembly
are aligned.
Installation (All Models)
NOTE: The drive shaft assembly, with cross and bearings installed, must have its yoke ears at each end of the shaft on same plane.
Before
installing drive shaft, clean yoke and inspect
machined surface
for scratches, nicks or burrs.
Provide
support for drive shaft during installation to
prevent damage to
universal joints. Position front end of shaft and
aligning marks
noted during removal.
Install
and attach 2 clamps to pinion yoke.
Install 4
screws and lock washer
assemblies on CV joint at transfer case. Use
press
bar to prevent assembly from rotating while attaching
screw
assemblies.